233 results found
-
Does Old National offer overdraft coverage for checking accounts?
In an effort to help you avoid returned checks or declined transactions, we provide protection services called Overdraft Courtesy and Overdraft Protection. These two services can also be used together for extra protection. Learn more about our Overdraft Solutions.
Overdraft Courtesy
Most Old National checking accounts come with Overdraft Courtesy. With Overdraft Courtesy, even if you don’t have enough available money in your checking account, we may still approve and pay checks you’ve written, as well as ACH and recurring debit card transactions (such as utility bills). Overdraft Courtesy does not cost anything unless you use it. If your account becomes overdrawn by more than $25, we will charge you a $36 fee for each overdraft item, up to 2 per day. You are responsible for paying the amount of any overdraft on your account immediately. If your account is overdrawn 7 or more consecutive business days, we will charge a $7 Daily Overdraft fee each business day the account is overdrawn by more than $25 (beginning on day 7), for up to 5 business days.Overdraft Protection
Overdraft protection allows you to link your account to another Old National account. If you accidentally overdraft, we will draw the funds from your linked account. There is no annual fee for the Overdraft Protection service, and you can link to other Old National checking, savings, or money market accounts or a line of credit. The transfer amount will be the exact amount needed to cover the total overdraft amount at the end of each business day, provided your linked account has a sufficient available balance. If sufficient funds are not available in your linked account, we will transfer what is available. Any items not covered by the funds in your linked account will be paid or returned at the Bank’s discretion and applicable overdraft and other account fees may be charged.For business analysis accounts, an Overdraft Protection Transfer Fee of $5 is charged for each transfer from your linked account.
To sign up for Overdraft Protection, or for more information about either service, please visit any Old National Banking or call Client Care at 1-800-731-2265.
-
How do I set up Text Banking and Automated Alerts?
Text Banking and Automated Alerts enable you to receive a variety of account-related notifications via your mobile phone. You can receive Automated Alerts by email as well.
To set up these services, sign in to Digital Banking. Select Additional Services at the top of the screen and then Text Banking & Alerts. You will first be taken to an Alerts and Notifications screen, where you can sign up for Automated Alerts. If you enter your mobile phone number on this screen, the number will carry over when you set up Text Banking.
To set up Automated Alerts
- Enter your email address if you want to receive Automated Alerts by email.
- Next, enter your phone number and click Activate. A verification code will be sent to the phone number provided. Enter this code in your Digital Banking and click Accept.
- To choose and set up your alerts, select the Add an alert button.
Automated alerts are sent throughout the day. In most cases, this means you will be notified about events such as low balances, large deposits or large withdrawals about 20-30 minutes after they happen.
How to set up Text Banking with text messaging commands
- Under Text Message Banking (to the right of Alerts and Notifications) select Update.
- If you want, you can enter a second phone number here.
- Choose your primary account for Text Banking. This is the account that you will receive balance and history for when requested through Text Banking.
- If you have a second checking or savings account, you can enroll it as a secondary account to transfer funds to the primary account when requested.
- When all information is entered, select Done. You should receive a confirmation text message.
Here is the information you can obtain by sending the following text commands to 454545:
- BAL – Balance for primary account in Text Banking
- Your text will include both the Current and Available balances.
- BAL ALL – Balance on all accounts within Digital Banking
- Your text will include only the Current balance which is the balance as of the end of the previous business day. It does not include transactions that are pending or on hold.
- LAST – Last 5 transactions for primary account in Text Banking
- TRANS (amount) ex. TRANS 200 – Transfer funds to primary account from secondary account in Text Banking
- STOP – Deactivate service
- HELP – Help keywords
Note: The Text Banking function will not work if you have an automated signature attached to your text messages.
Visit our Text Banking page for more information. For assistance with setting up Automated Alerts or Text Banking, please call Client Care at 1-800-731-2265.
-
What is a commercial lending bank?
Broadly speaking, there are two types of bank clients: Personal banking clients are individuals who need banking services, while commercial banking clients are larger businesses, companies or organizations that need banking services.
A bank that lends to larger businesses would be a commercial lending bank. At Old National, we offer a variety of commercial lending services.
-
Can I cancel a payment in Zelle®?
You can only cancel a payment if the person you sent money to hasn't yet enrolled with Zelle®. To check whether the payment is still pending because the recipient hasn't yet enrolled, you can go to your activity page, choose the payment you want to cancel and then select Cancel This Payment.
If the person you sent money to has already enrolled with Zelle®, the money is sent directly to their bank account and cannot be canceled. This is why it's important to only send money to people you trust, and always ensure you've used the correct email address or U.S. mobile number when sending money.
If you sent money to the wrong person, we recommend contacting the recipient and requesting the money back. If you aren't able to get your money back, please call the Old National Client Care team at 1-800-731-2265 so we can help you.
Scheduled or recurring payments sent directly to your recipient’s account number (instead of an email address or mobile number) are made available by Old National but are a separate service from Zelle® and can take one to three business days to process.
You can cancel a payment that is scheduled in advance if the money has not already been deducted from your account.
-
How do you write a check?
To write your check, fill out the fields carefully and sign at bottom right. We’ve included a properly filled out check below, as an example.
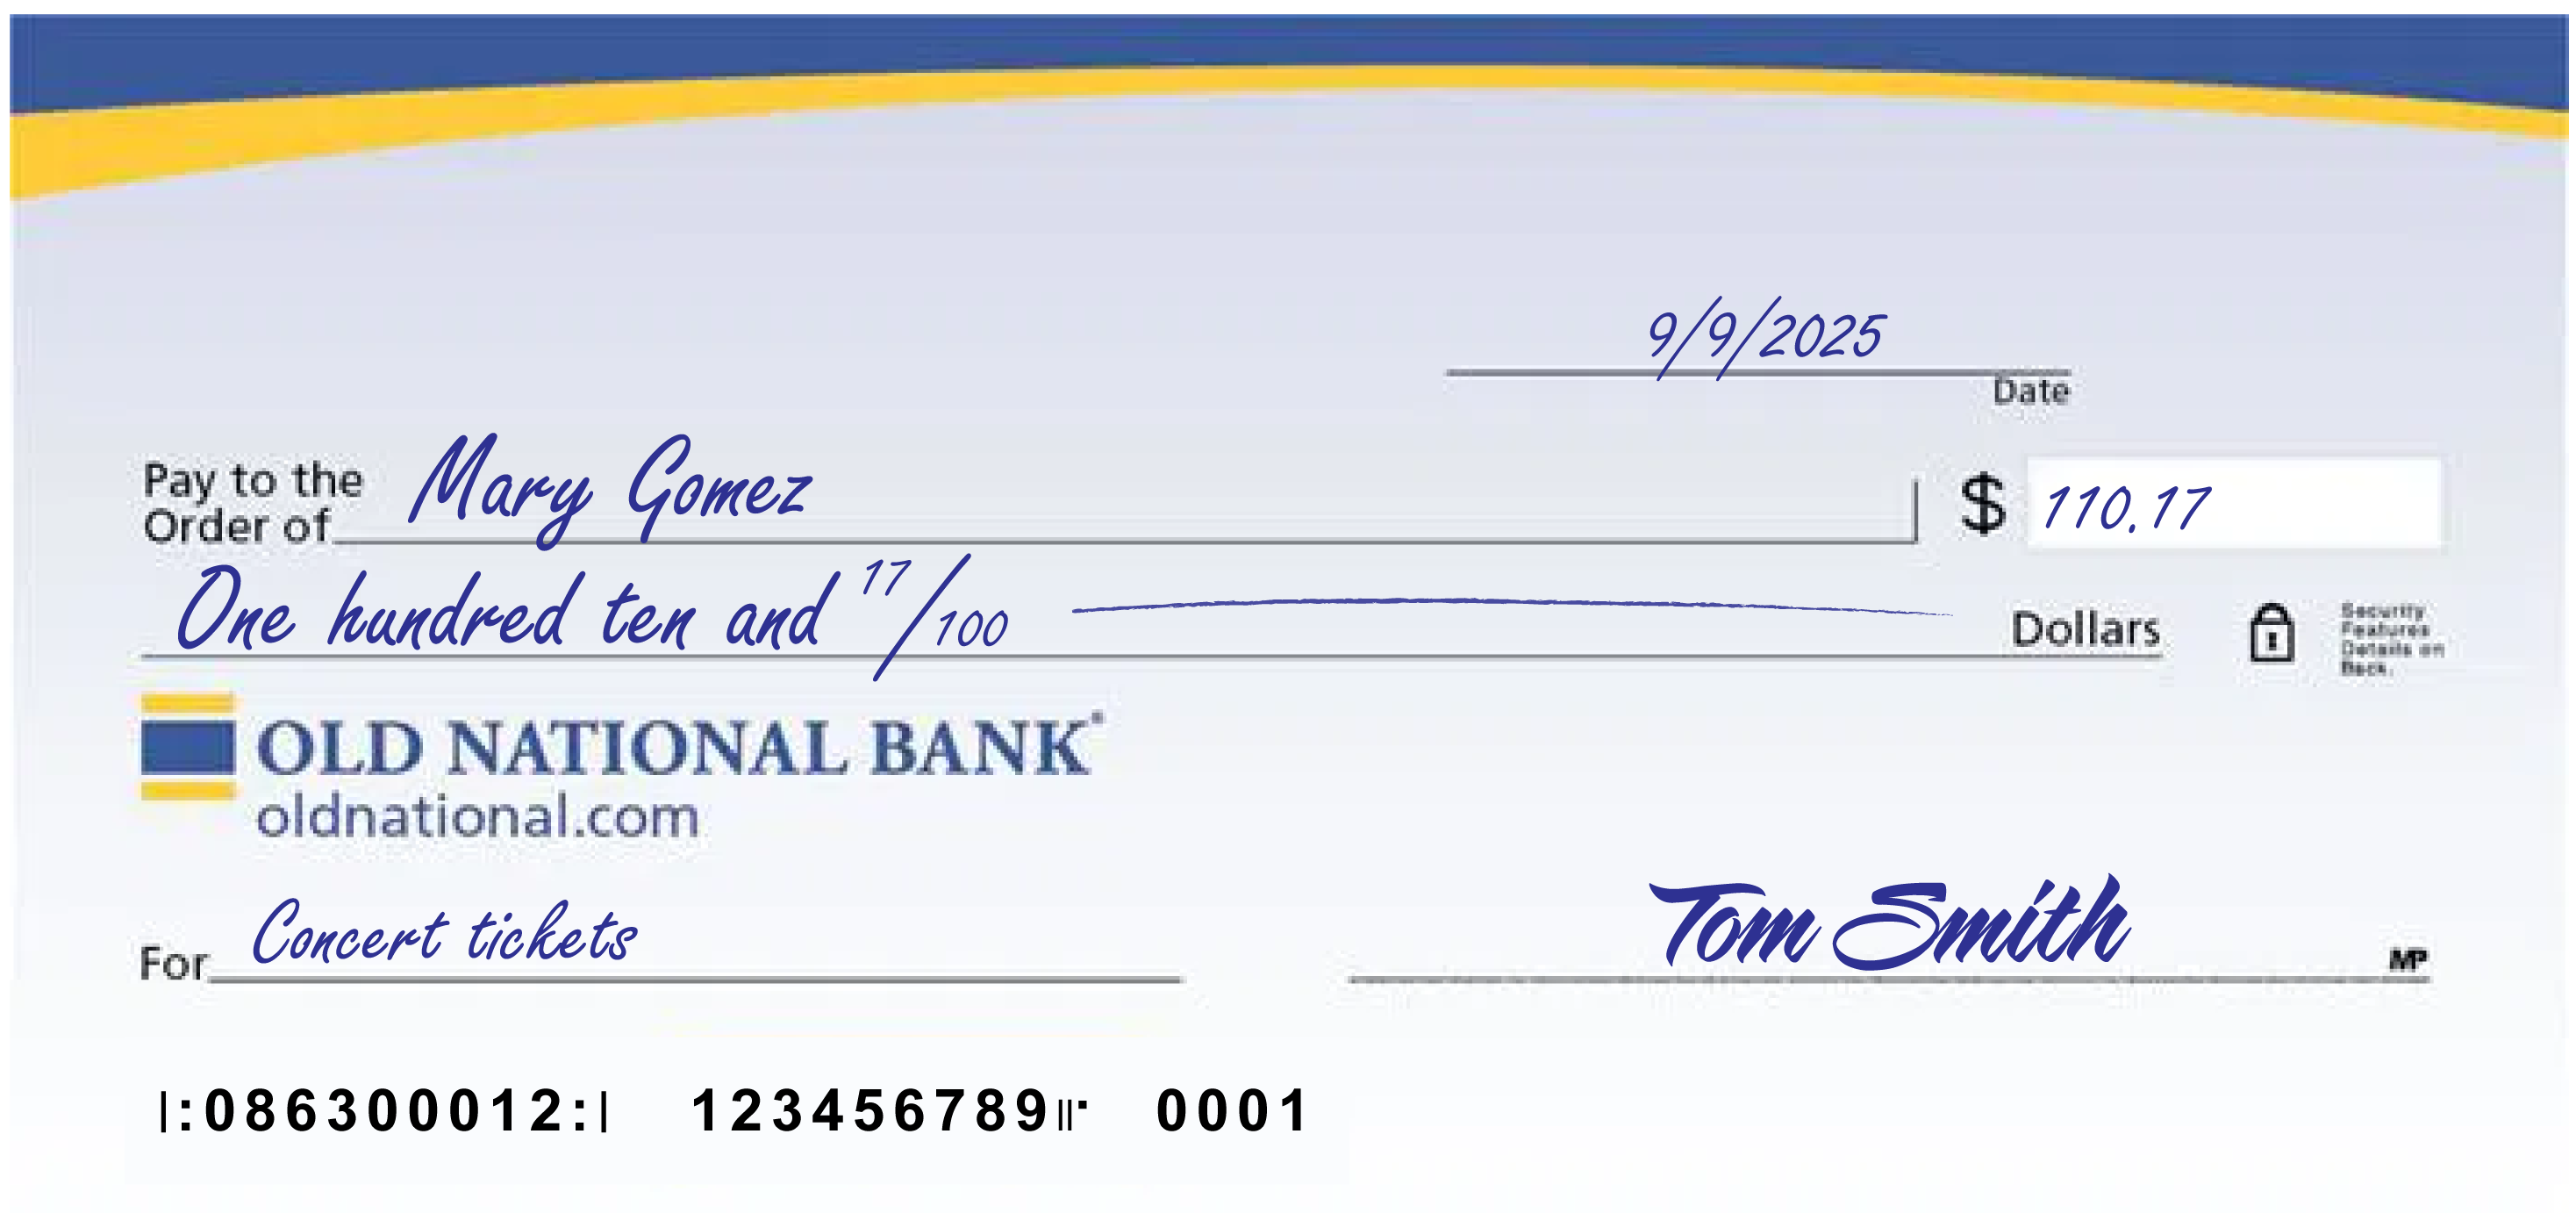
A few notes:
- The date at the upper right can be any standard format that includes the day, month and year.
- Write the full name of the person, business entity, or organization who is receiving the check in the “Pay to the Order of” field.
- The box at the right is for a numerical representation of the amount you’d like to pay the recipient.
- The line with “dollars” at the end is where you write out the amount you’d like to pay the recipient in words; write the cents as a fraction XX/100; if there’s extra space, draw a line until “dollars” so that no one can adjust the amount you wrote.
- The lower left field is for personal notes; this is optional. Some people like to write what the check is for, so they can remember when reviewing their records; If you’re paying a specific bill, you may be asked to write your invoice number or other identifying information you have on record with the company you’re paying.
- Sign the check at lower right with the signature that you use for all important documents.
- If you make a mistake on your check, you can cross it out and put your initials next to it and then write what you meant to write.
-
What is a secured credit card?
A secured credit card is a special type of credit card that allows users with no credit (or poor credit) to build (or repair) their credit score.
It works like this: The cardholder puts down a cash deposit as collateral to “secure” the card. The amount of cash put down is typically the cardholder’s credit limit. The cardholder then uses the card normally and their activity is reported to credit agencies, as it would be for any credit card.
As a result, the cardholder has the opportunity to build (or repair) their credit by making regular, on-time payments, among other things.
At Old National Bank, we offer two secured credit card options.
-
What is a line of credit loan?
A line of credit loan is a flexible loan that allows you to borrow what you need, as you need it, up to a set credit limit. As long as you follow your repayment terms, the loan remains open and you can borrow again. The most common example is a credit card, where you can continue to use it month after month, provided your account is in good standing. Other examples include Home Equity Lines of Credit (HELOCs) and revolving lines of credit for businesses.
The contrasting loan type is a fixed loan, where you’re given a set amount of funds upfront, with the expectation that you repay the loan amount with interest over a set period of time. Once you’ve paid off the loan, there’s no opportunity to borrow again; you’d need to reapply for another loan. Common examples include mortgages, car loans and personal loans.
-
How can I send a wire transfer?
To send money to both personal and business accounts in the US and internationally, visit your nearest Old National Banking Center.
To learn more about domestic and international wires, including wire transfer fees, visit our Business Wire Transfers page or our Personal Wire Transfers page.
-
How can I get a copy of a check in Digital Banking?
Once a check you have written to make payment has cleared on your Old National checking account, you will automatically have an image of it within your Digital Banking transaction history.
On a web browser
- Sign in to Digital Banking, go to My Accounts and select the checking account the check was written on. Here you can narrow your search for the image of the check.
- Under Account History, set the date range when the check cleared your account.
- Next, under "Narrow by items containing," enter keywords to help you find a specific check. You can search by check payee, check number or check amount. You can also simply search by the word "check" to pull up all checks within your designated time frame.
Once you have located the check image you are searching for, you can select it to open an image of the front and back of the check. Above the check, to the right, is a printer icon you can use to print a copy of the check.
Mobile App
- Within the Mobile App, go to Accounts and select the checking account the check was written on.
- At the very top of the screen, you will see a Search box with the words Search transactions. Here you can enter the check number (if you know it). You can also simply enter the word "check," to pull up all checks that have cleared your account.
- When searching for a check image within your Mobile App, you will not have the option to search by date range or as far back as you can within Digital Banking.
- Once you find the check you are searching for in the Mobile App, tap it to open an image of the front of the check only.
- From here, you can view or take a screenshot of the check image.
If you have trouble locating your check image within Digital Banking, please contact Client Care at 1-800-731-2265.
-
Is there a limit on how many people can be in a banking center?
We have re-opened our banking centers and are no longer limiting the number of people who can be inside the lobby at one time. Appointments continue to be accepted and encouraged.